
| Home | Applications | How to Buy | FAQs | Quick Start Guide | History | Users | Contact |
The BIT-C-128 Video DAC has been designed to allow you to get started quickly and with no tools. Here's how.
When handling non-enclosed circuit assemblies, use care to avoid damaging them with electrostatic discharge (ESD), which is caused by sudden large changes in electrical potential ("voltage") after static electricity accumulates. To minimize risk of damage, touch grounded surfaces to discharge your static buildup as often as practical and handle circuit assemblies by their edges and metal connector shells to equalize electrical potential between you and the assembly. Following these simple rules should help maximize the useful life of any circuit assembly.
Before applying power to the Gonbes and BIT-C-128 circuit boards, please make sure they are not on surfaces that conduct electricity or that can build up static electricity—basically no metal or plastic. (When operating, circuit boards should not touch the metalized plastic bags they ship in.) Wood, cardboard, and paper thick enough to isolate any component leads are good options.
Gonbes units each include a power cable and a signal cable, both with tinned wire ends.
To connect the cables to the video DAC, insert the tinned ends of the wires following the instructions below. Start with the two-wire power cable, inserting the red wire into the terminal on the end nearest to where the legend says "CN2", and components D1 and C1. (On the underside of the board, the legend indicates "5V" for that terminal.)
The wires supplied with the GBS-8200 have shorter exposed ends, which may make their insertion difficult. Extra care must be used to assure their connections to the terminal block are secure.
For each wire:
(Whenever you want to remove a wire, hold the button down to release the wire and gently pull the loose wire from the hole.)
Into the next holes, insert the black ground wire from the power cable. Then the signal cable's black, yellow, gray, red, green, and blue wires, in that order, as in the table below. When done, connect the DAC to your computer, either directly or through a cable up to about six feet long.
| Gonbes Cable | Wire Color | PCB Legend | Function |
|---|---|---|---|
| power | red | +5V | power supply |
| black; | GND | power supply return ("ground") | |
| signal | black | GND | signal return ("ground") |
| yellow | V | vertical sync | |
| gray | H/H+V | horizontal sync (jumper removed) or composite sync (jumper present) | |
| red | R | red channel analog output | |
| green | G | green channel analog output | |
| blue | B | blue channel analog output |
IMPORTANT: Be sure to use only a 5-volt DC adapter, as specified by the Gonbes instructions. Supplying more than 7 volts may damage the video DAC.
Once the tinned end of each wire has been connected to the terminal block on the video DAC, insert the cables' connectors into the Gonbes unit, if you have not already done so. Connect the two-wire cable to its mating connector near the power entry connector on the Gonbes unit, and the six-wire cable to its mating connector near the opposite corner of the Gonbes unit.
Setting up a brand-new Gonbes GBS-8200 or GBS-8220 unit can be tricky, especially as many come with their default language set to Chinese. To set the default language on the Gonbes board to English, connect a VGA monitor and power, and:
(Note that the last item on each menu is "Exit".)
When the power is switched on or the reset switch is pressed and released on the Commodore 128, the position of the "40/80 Col" switch on the keyboard determines whether it will function in Commodore 128 40-column mode (when the switch is up) or in 80-column mode (when the switch is down). The C-128 helps to indicate that it is on and in 80-column mode by leaving its 40-column output active, but with the normal border and text area it displays remaining blank.
Set the 80-column switch on the keyboard of your Commodore 128 to the down position, turn it on, and watch the magic!

The Gonbes unit has menu settings allowing its output geometry to be scaled to match your monitor—whether it's aspect ratio is wide-screen (16:9) or like standard definition TV (4:3)—and your preferences—whether you want to fill a wide screen (as pictured at right) or to keep the pixels square ("pillarbox" on wide-screen displays) and adjust margin sizes.
The Commodore 128 and 128D each use two different video circuits; the 80- column video is output via the DE-9 connector and the 40-column video is output via the 8-pin circular DIN connector.
Although the BIT-C-128 Video DAC is only designed to work with the Commodore 128's 80-column video output, you can also get 40-column output on a VGA display in grayscale just by plugging in a cable that you probably already have. If using a Gonbes unit to drive a VGA display:
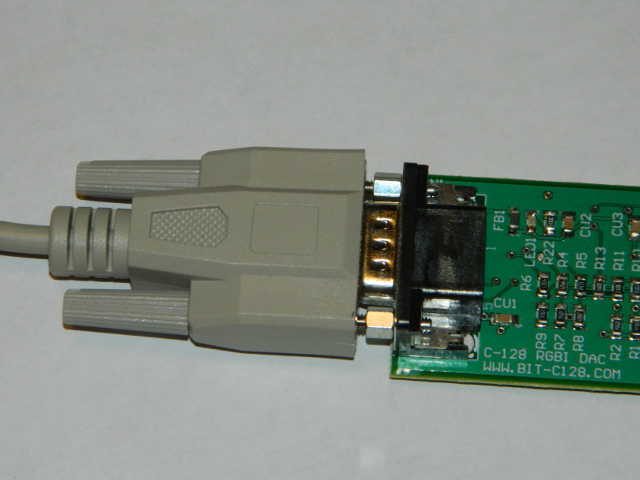
The video DAC may also be used with an optional DE-9 extension cable between the computer and the video DAC. The length of such a cable should not exceed about 6 feet or 2 meters. If such a cable is used, it may be secured to the video DAC by adding two jack screws, as pictured at right. Note that these jack screws allow the video DAC to be mounted through a plate having thickness of up to 1/16" (1.5875 mm).
The video DAC may also be used to drive a pre-VGA (<17 kHz) analog display directly. For example, the video DAC has been tested driving the analog RGB and composite sync inputs of a Sony PVM-1342Q. (The PVM-1342Q also has a digital RGBI input that a C-128 can drive directly using an extension cable with DE-9—9-pin D-shaped subminiature—connectors, although the colors displayed may differ slightly without the video DAC.)
Driving a display like this, the video DAC will need a source of 5-volt power, such as from a USB port or power adapter.
As mentioned above, the Commodore 128 and 128D use different video circuits to produce their 40-column and 80-column display outputs. Fortunately, many monitors that include RGB inputs also include inputs for composite video (CVBS) and/or S-Video (Y/C), which can be output from the 8-pin circular DIN A/V port.
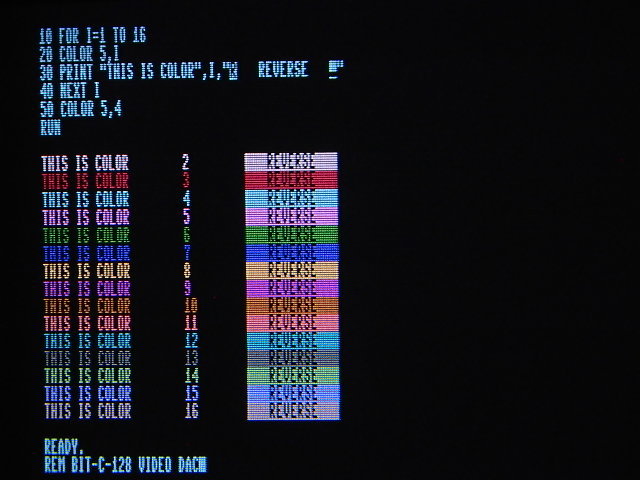
To check the color palette, enter a program like the one pictured at right (click it to enlarge) and copied below, using Rvs On (CTRL+9) and Rvs Off (CTRL+0) to generate the R and _ characters, respectively.
10 FOR I=1 TO 16
20 COLOR 5,I
30 PRINT "THIS IS COLOR",I,"R REVERSE _"
40 NEXT I
50 COLOR 5,4
(Note that when in Commodore 64 40-column mode, color is set instead with the command "POKE 646,I", as shown on the applications page.)
Your output should look like the image at right, which was taken from a broadcast-quality CRT (Sony PVM-1342Q) driven directly from the video DAC, which represents the DAC's color palette with reasonable accuracy.
Please remember that the BIT-C-128 Video DAC is a specialty item that I sell to serve our community of like-minded C-128 enthusiasts, and that I'm here to help in any way I can.
If you need help using a BIT-C-128 Video DAC—especially after reading this page—please send me a note via the contact page.
I also appreciate feedback, which helps me to provide a better experience to BIT-C-128 Video DAC users worldwide.
| Copyright © 2015-2024 John R. Carlsen – ALL RIGHTS RESERVED. This page created and maintained with vi and gedit. |